Why would I need this?
During a recent update of this site, I needed to find the dimensions of the browser's window in order to modify elements when the window is resized. I wondered how I could retrieve the browser's dimensions in a shiny app and use them in the shiny server. You probably will never need to use the window dimensions in a shiny app (apart from CSS and JavaScript files). The purpose of this tutorial demonstrates how to send data from JavaScript to the Shiny server rather than using window dimensions in Shiny.
In this tutorial, I will focus mostly on the JavaScript and how to structure the shiny app. Some CSS is also used in the app, but I will not cover that here. I will try to keep the concepts simple and provide links for further reading where applicable. If you have any questions or if something is not clear, feel free to open a new issue.
How does this app work?
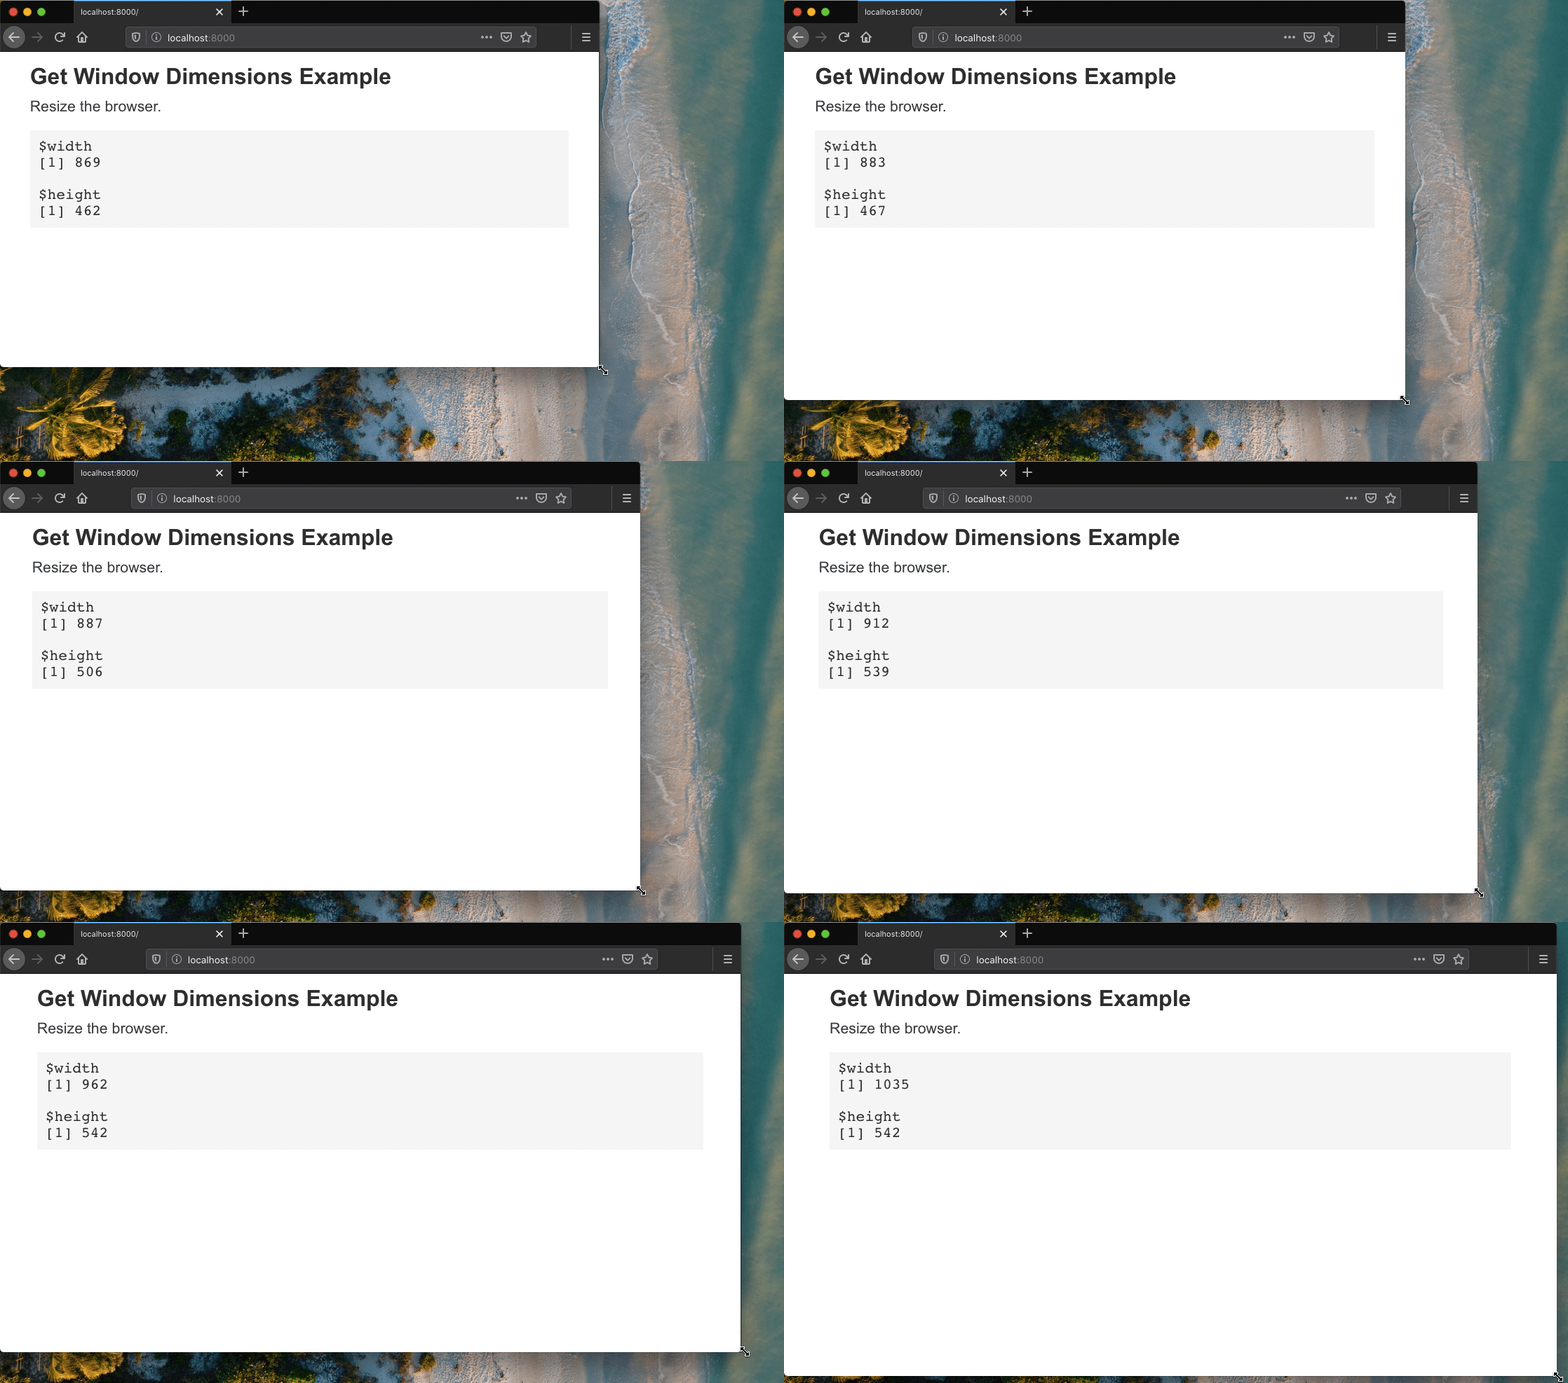
We will build a shiny app that retrieves and displays the window dimensions in shiny UI.

In the GIF, there are a few things happening. When the window is resized, the browser dimensions are retrieved and sent to Shiny's input object (i.e., session$input) using a JavaScript event. In the shiny server, there is a observeEvent that triggers when an input is changed. This event reads the data and renders it to the client.
To build this example, here is what you will need.
- Define the Shiny UI
- Write the JavaScript functions
- Create an event that processes and renders the window dimensions
Define the Shiny UI
The UI for this app is pretty straightforward. I am using the single file app approach and using tagList() method to build the UI. CSS and JavaScript files are loaded from the www directory. I will also use an verbatimTextOutput function which will be used to print the window dimensions.
ui <- tagList(
    tags$head(
        tags$link(rel = "stylesheet", href = "styles.css")
    ),
    tags$main(
        tags$h2("Get Window Dimensions Example"),
        tags$p("Resize the browser."),
        verbatimTextOutput("winSize")
    ),
    tags$script(src = "index.js")
)
Write the JavaScript functions
In the JavaScript file, we will write a few functions.
getWindowSize: a function that retrieves the window dimensions (height and width)setWindowSize: a function that sets the window dimensions to a Shiny inputaddEventListener: an event that runs the other functions when the window is resized. This event will be wrapped in another eventshiny:connectedto make sure Shiny's assets are loaded and available in the browser.
getWindowSize
The function getWindowSize is used to return the height and width of the window. In the function, we need to make sure window is defined. This assures us that the function is running in the browser and not some other environment (e.g., node). If the object window is defined, the dimensions can be accessed by using the properties innerWidth and innerHeight.
function getWindowSize() {
    const isWindow = typeof window !== "undefined";
    return {
        width: isWindow ? window.innerWidth : undefined,
        height: isWindow ? window.innerHeight : undefined
    }
}
For more information, see Mozilla's guide on Window.
setWindowSize
The function setWindowSize attaches the output of getWindowSize to a reactive input using the Shiny function: Shiny.setInputValue(id, value). Enter a unique value for ID. Data sent to Shiny via value should be in JSON format (use JSON.stringify(value)).
function setWindowSize() {
    Shiny.setInputValue("window", JSON.stringify(getWindowSize()));
}
In this example, I am using "window" as the ID. In the Shiny server, the value of "window" can be accessed in the Shiny server using input$window. For more information on sending data from JavaScript, see RStudio's Communicating with Shiny via JavaScript guide.
addEventListener
The final step is to run the function setWindowSize when the window is resized. This can be done using addEventListener and the event resize. Since the function setWindowSize uses a Shiny function, the event should be attached once the shiny server has started. Use jQuery's on and set the event to run when shiny:connected.
$(document).on("shiny:connected", function() {

    // run on shiny:connected (i.e., initial)
    setWindowSize();

    // add listener (i.e., run when window is resized)
    window.addEventListener("resize", setWindowSize);
});
In this example, I used the function setWindowSize twice. The first instance will run as soon as shiny is connected. The second instance runs only when the window is resized. For more information on shiny:connected and other events, see RStudio's guide on JavaScript Events in Shiny.
Create an event that processes and renders the window dimensions
Now that the JavaScript functions and events are written, we can retrieve the values in the Shiny server using input$window. Since the data is sent in JSON format, it can be parsed using the fromJSON function from the jsonlite package. In this example, I want to display the dimensions in the UI, so I will use renderPrint.
server <- function(input, output, session) {
    observeEvent(input$window, {
        d <- jsonlite::fromJSON(input$window)
        output$winSize <- renderPrint({
            d
        })
    })
}
What do I need to know before I integrate this into my app?
The purpose of this event is to demonstrate how to send data from JavaScript to Shiny. You probably do not need to work with browser dimensions in the shiny server, but this app shows how you to do so. If you want to send you other data, here are the basic elements.
- Define a new reactive input that sends data in JSON format.
Shiny.setInputValue(id, JSON.stringify(value));- In the Shiny server, create a new event that receives and parses data.
observeEvent(input$id,{
    d <- jsonlite::fromJSON(input$id)
    # do something here
})- Use
shiny:connectedto run functions when shiny has started.
$(document).on("shiny:connected", function(event) {
    // do something here
});
How do I run the example?
The simplest way to run the example is directly from the R console using the function shiny::runGitHub.
install.packages("shiny")
shiny::runGitHub(repo = "shinyAppTutorials", username = "davidruvolo51", subdir = "get-window-dims")
Alternatively, you can clone the repository and run locally.
Further Reading
Here is a list of all resources linked in this tutorial.
- Mozilla's reference doc on Window
- RStudio's guide on Communicating with Shiny via JavaScript
- RStudio's guide on JavaScript Events in Shiny
